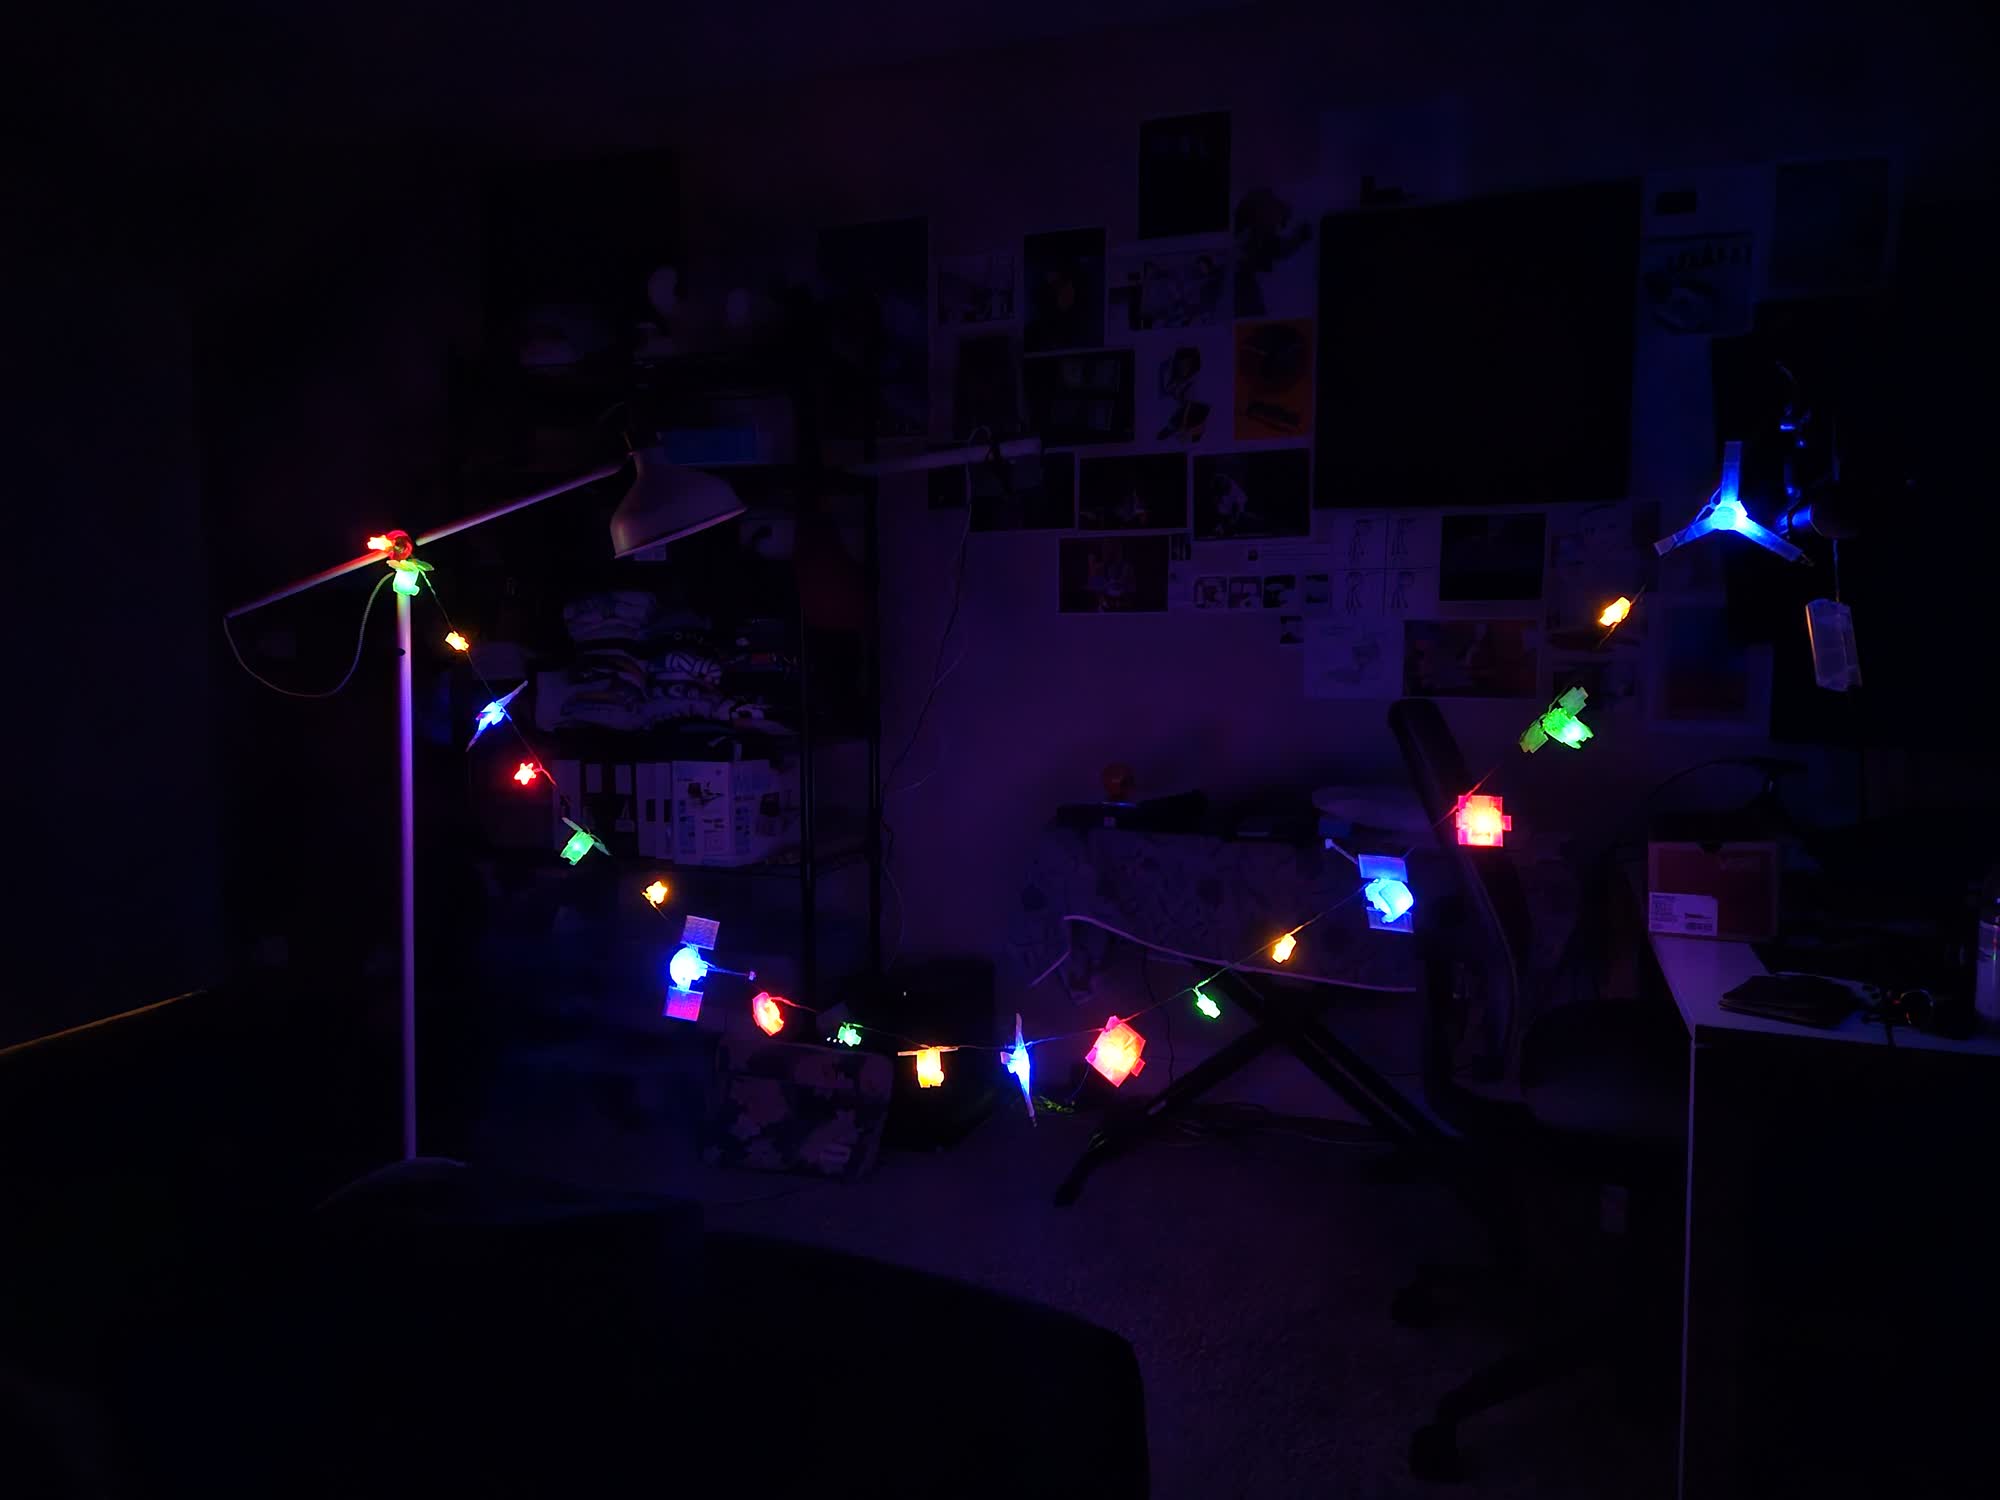
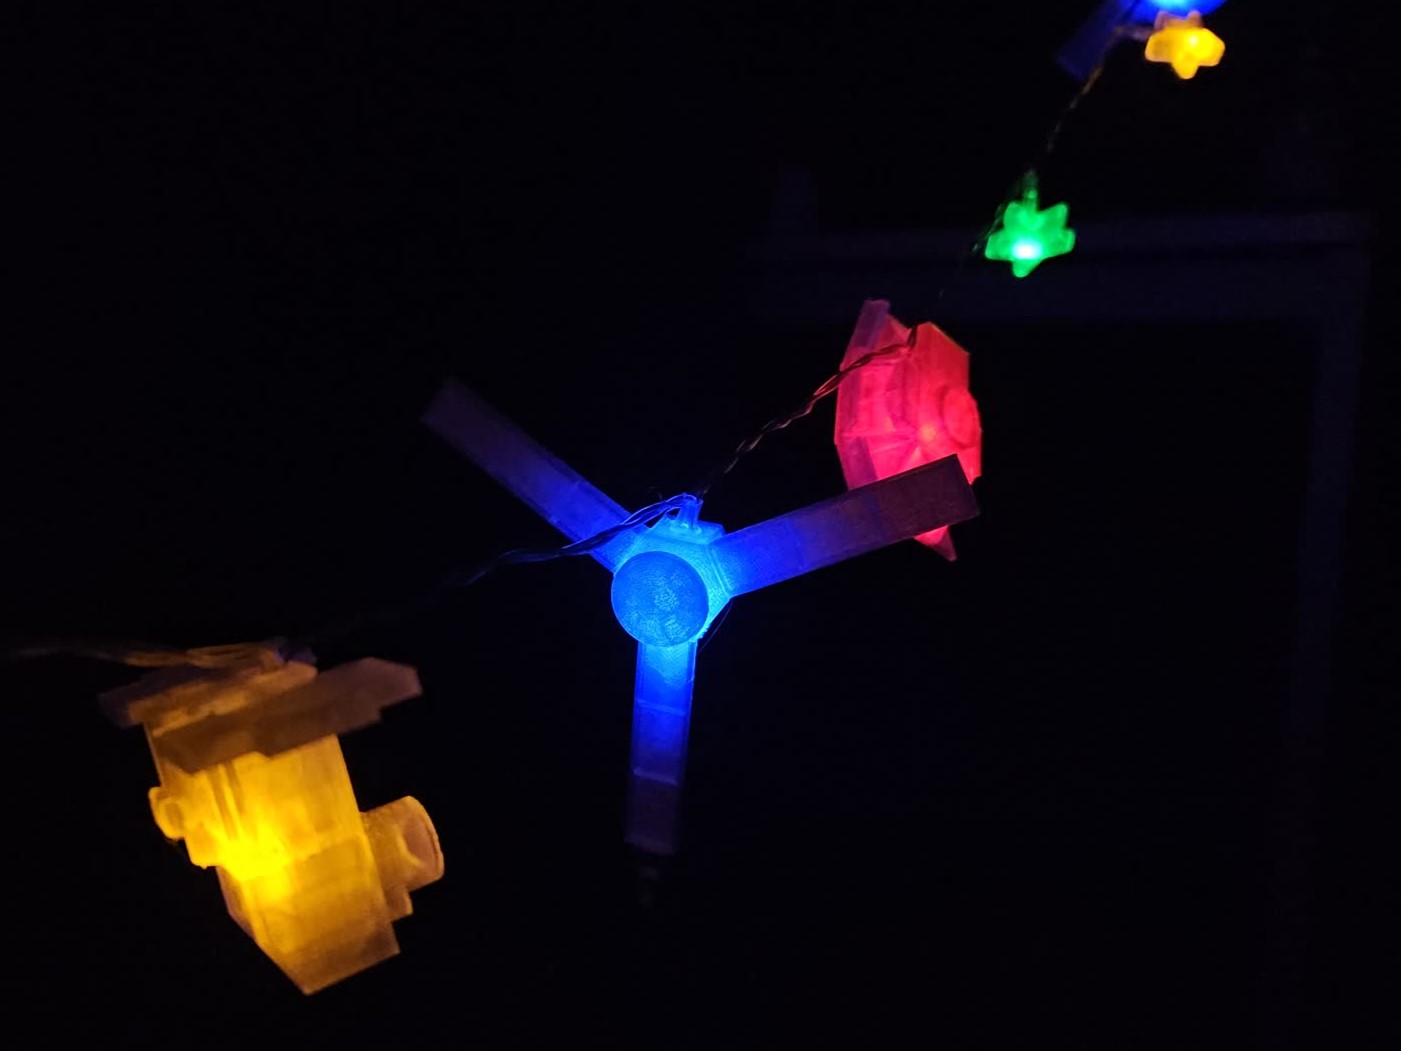
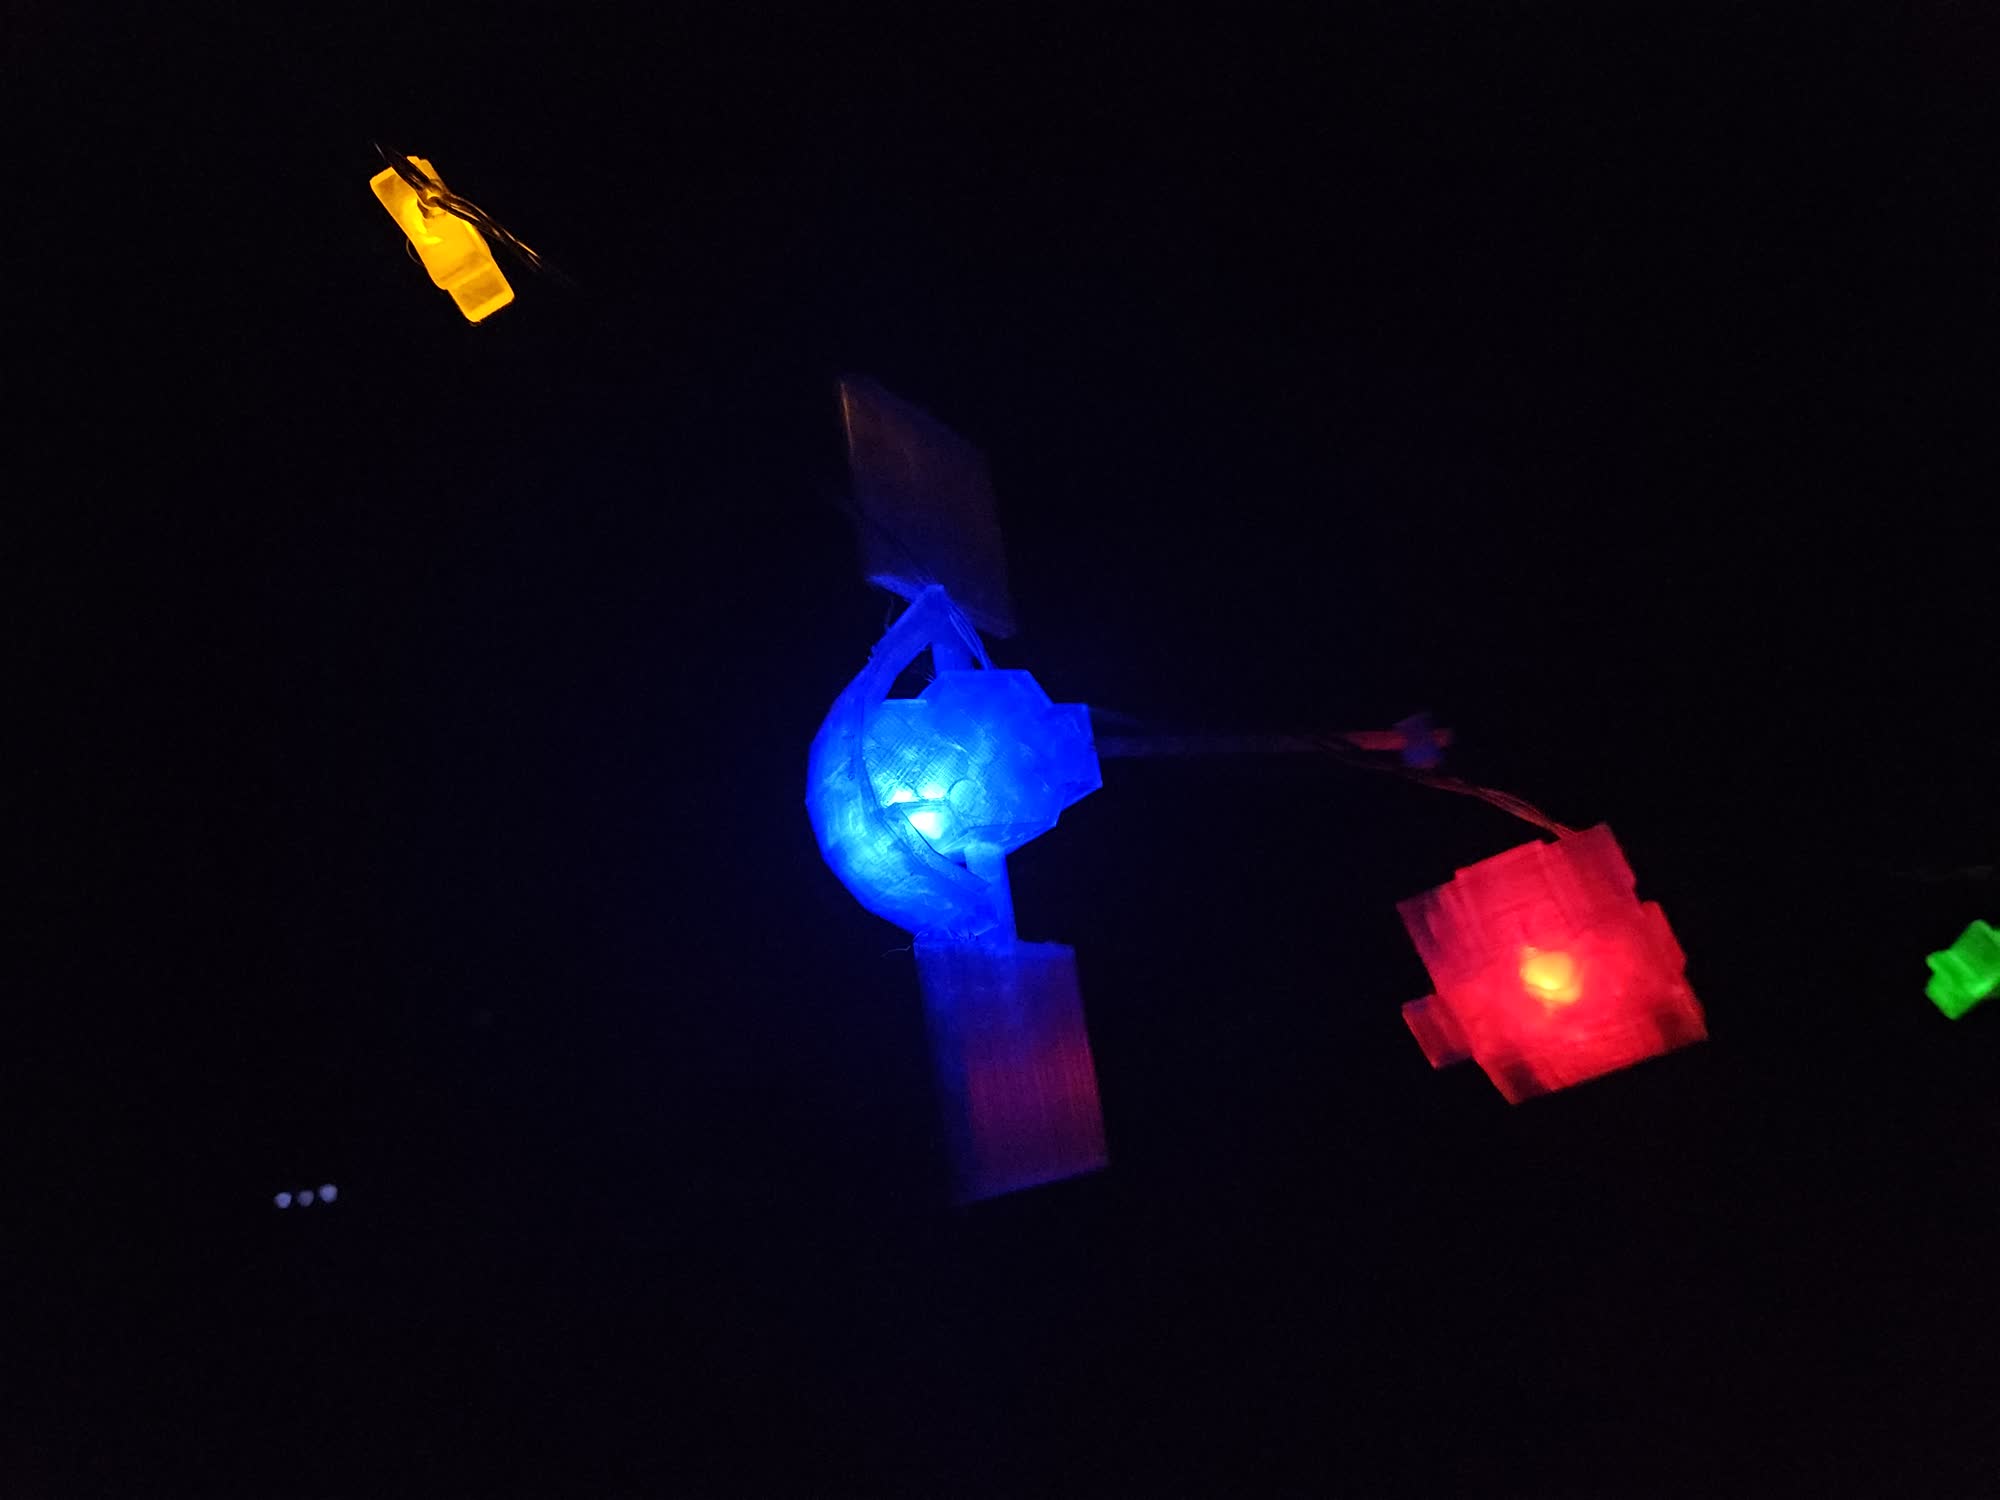
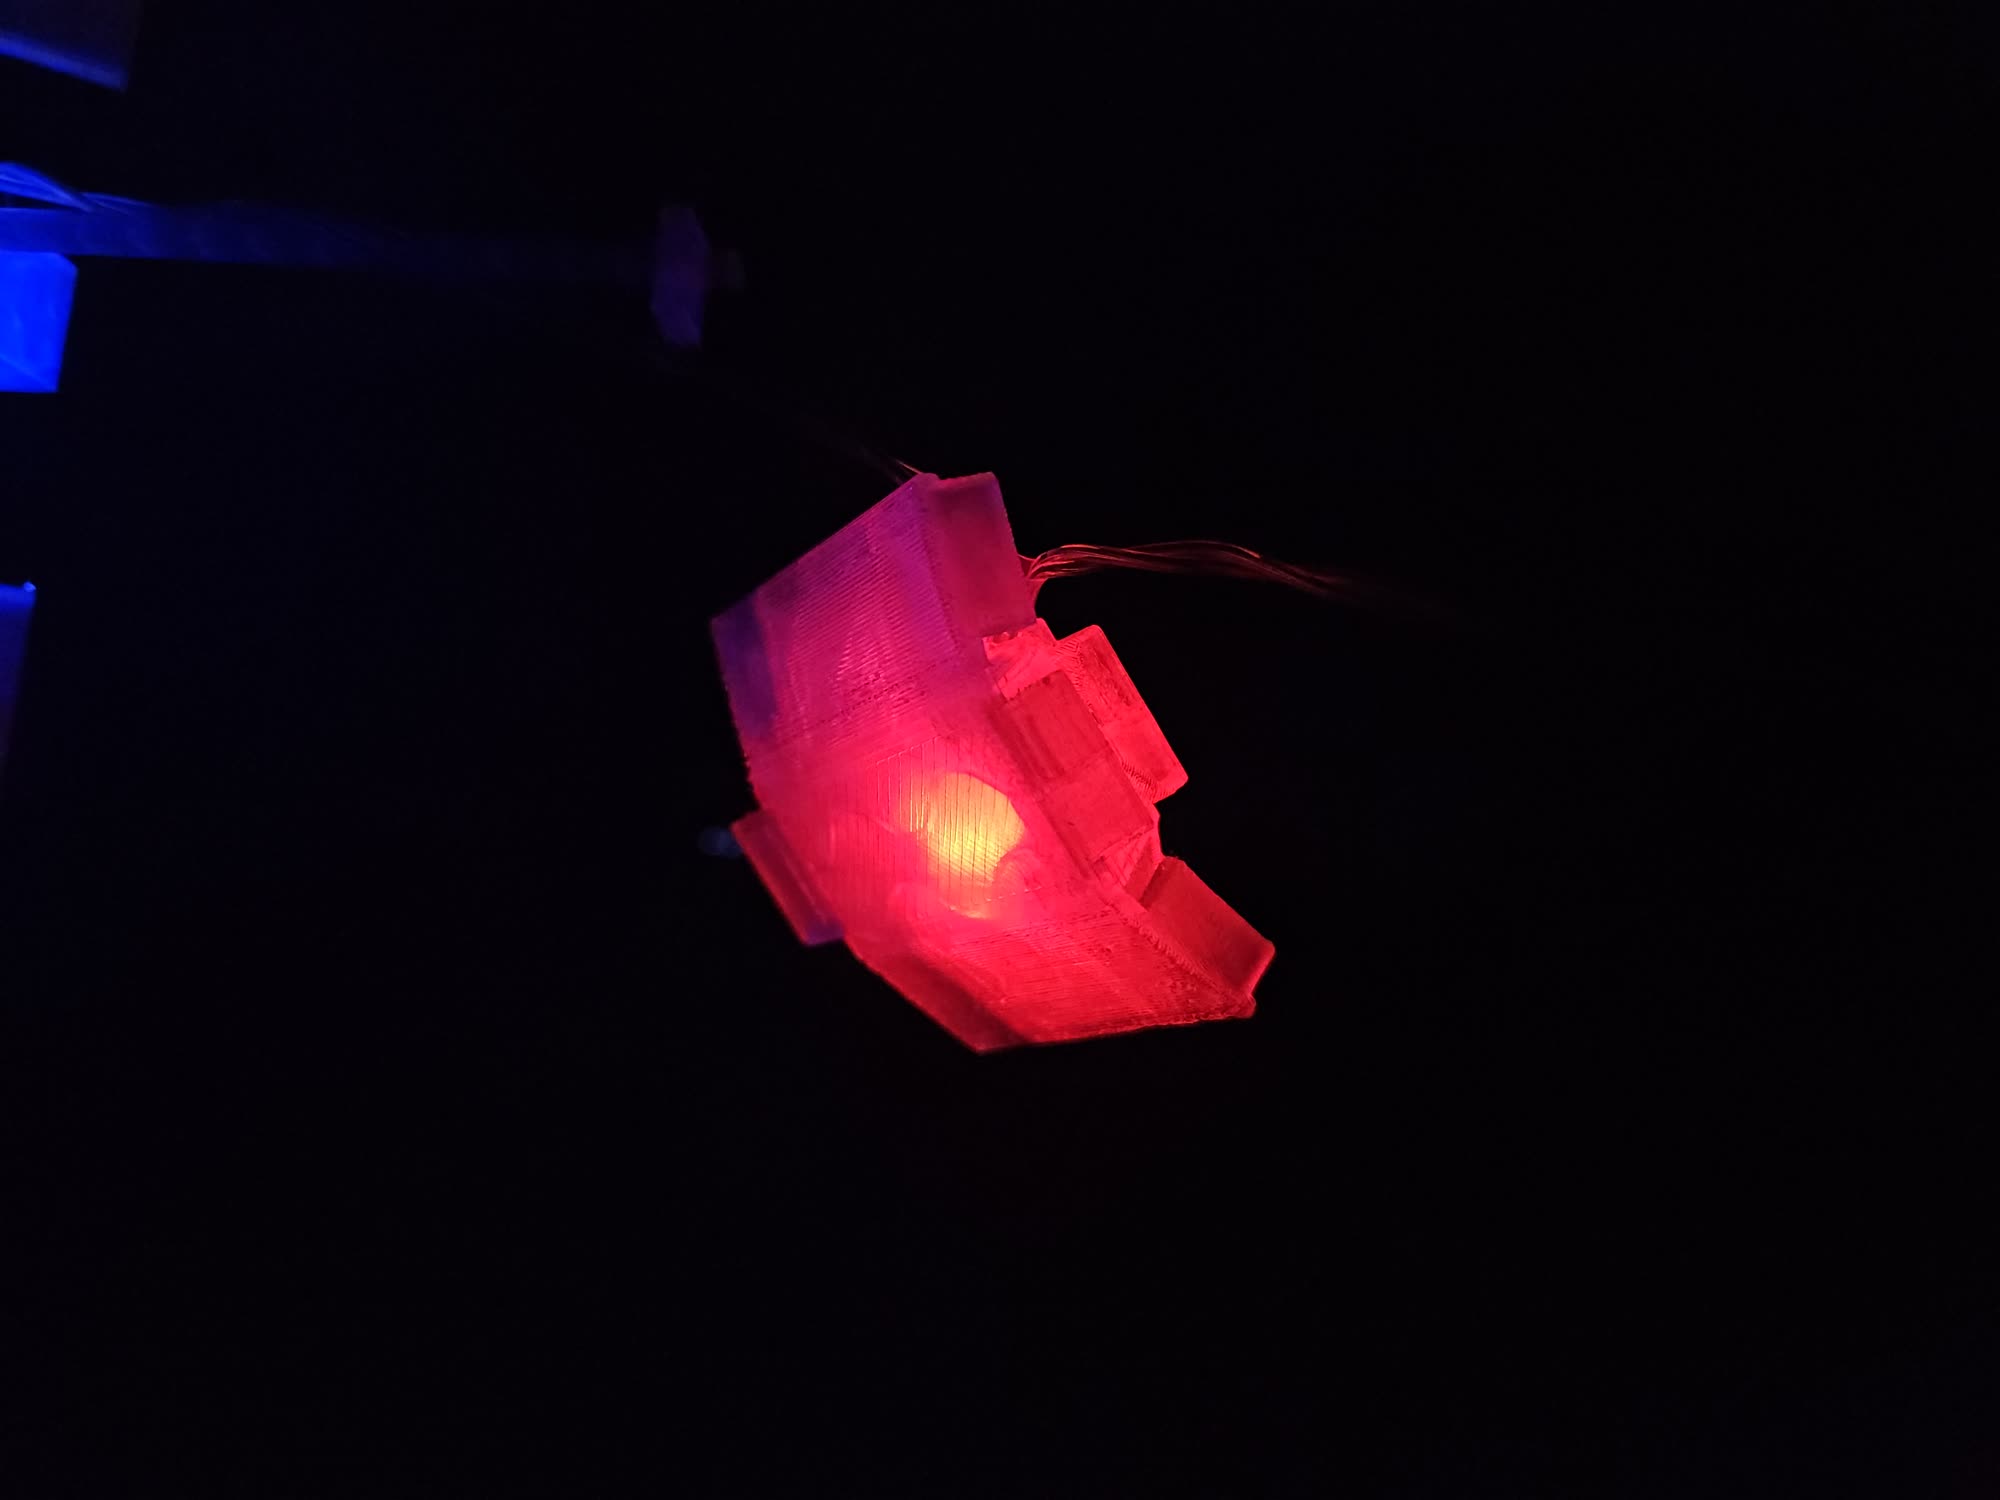
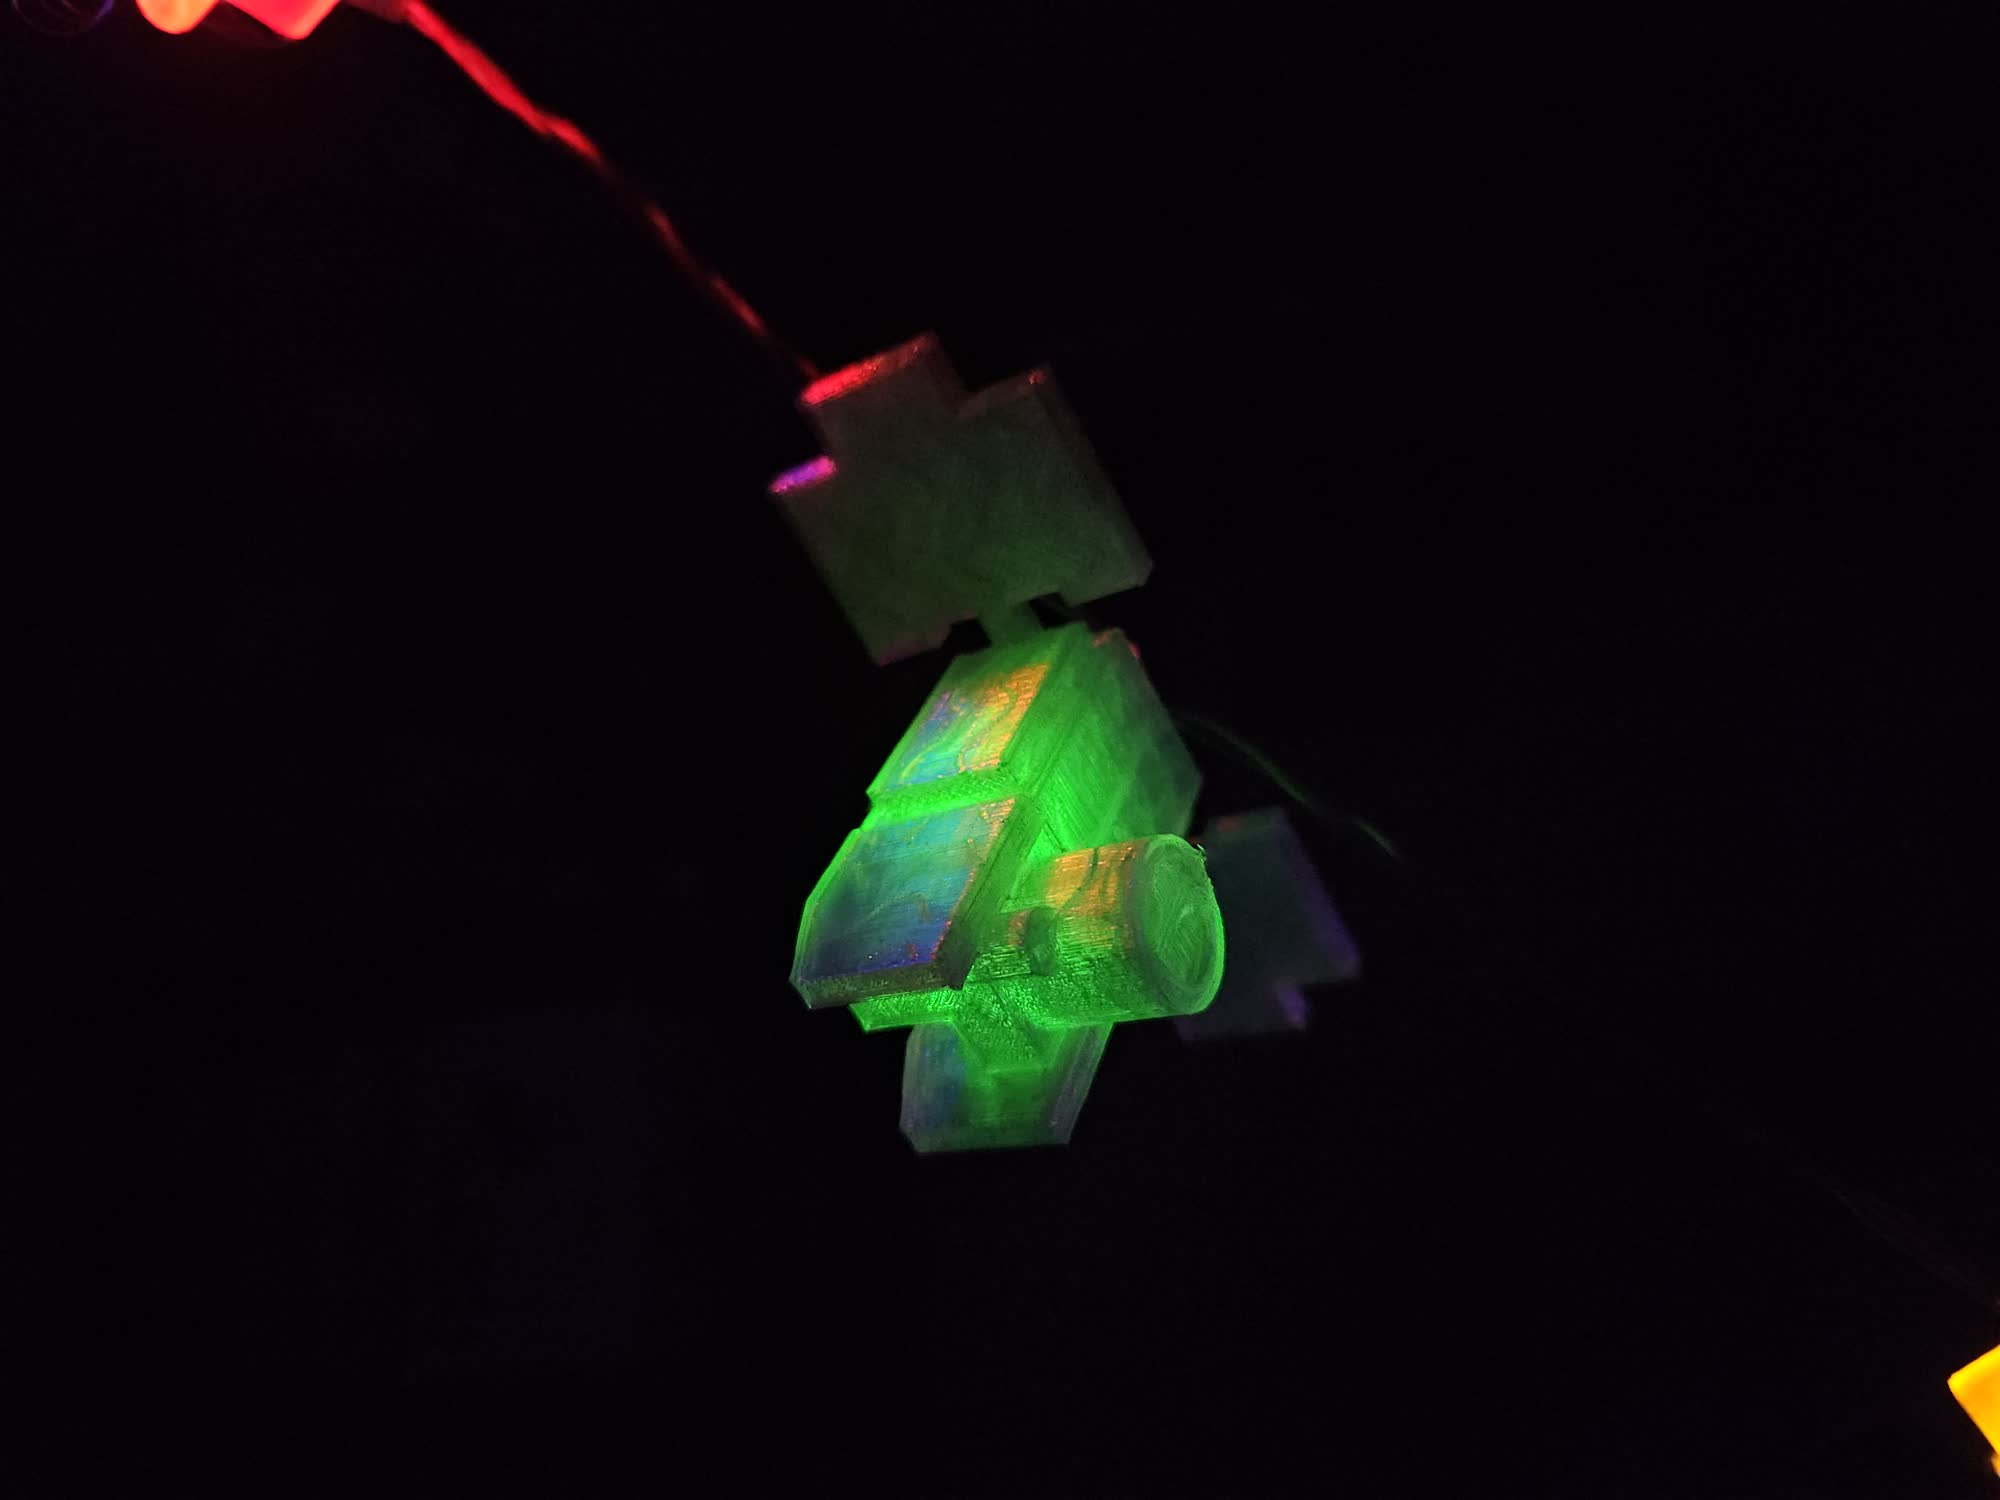
Made as a secret santa for Rusty as part of the 2025 Ebro gift exchange. I made lo-poly models of the space probes his OCs are based on, and attached them to an LED string light. I also modified the light to be powered from a USB plug, rather than AA batteries.
I made a battery-powered LAN network setup to carry with me.
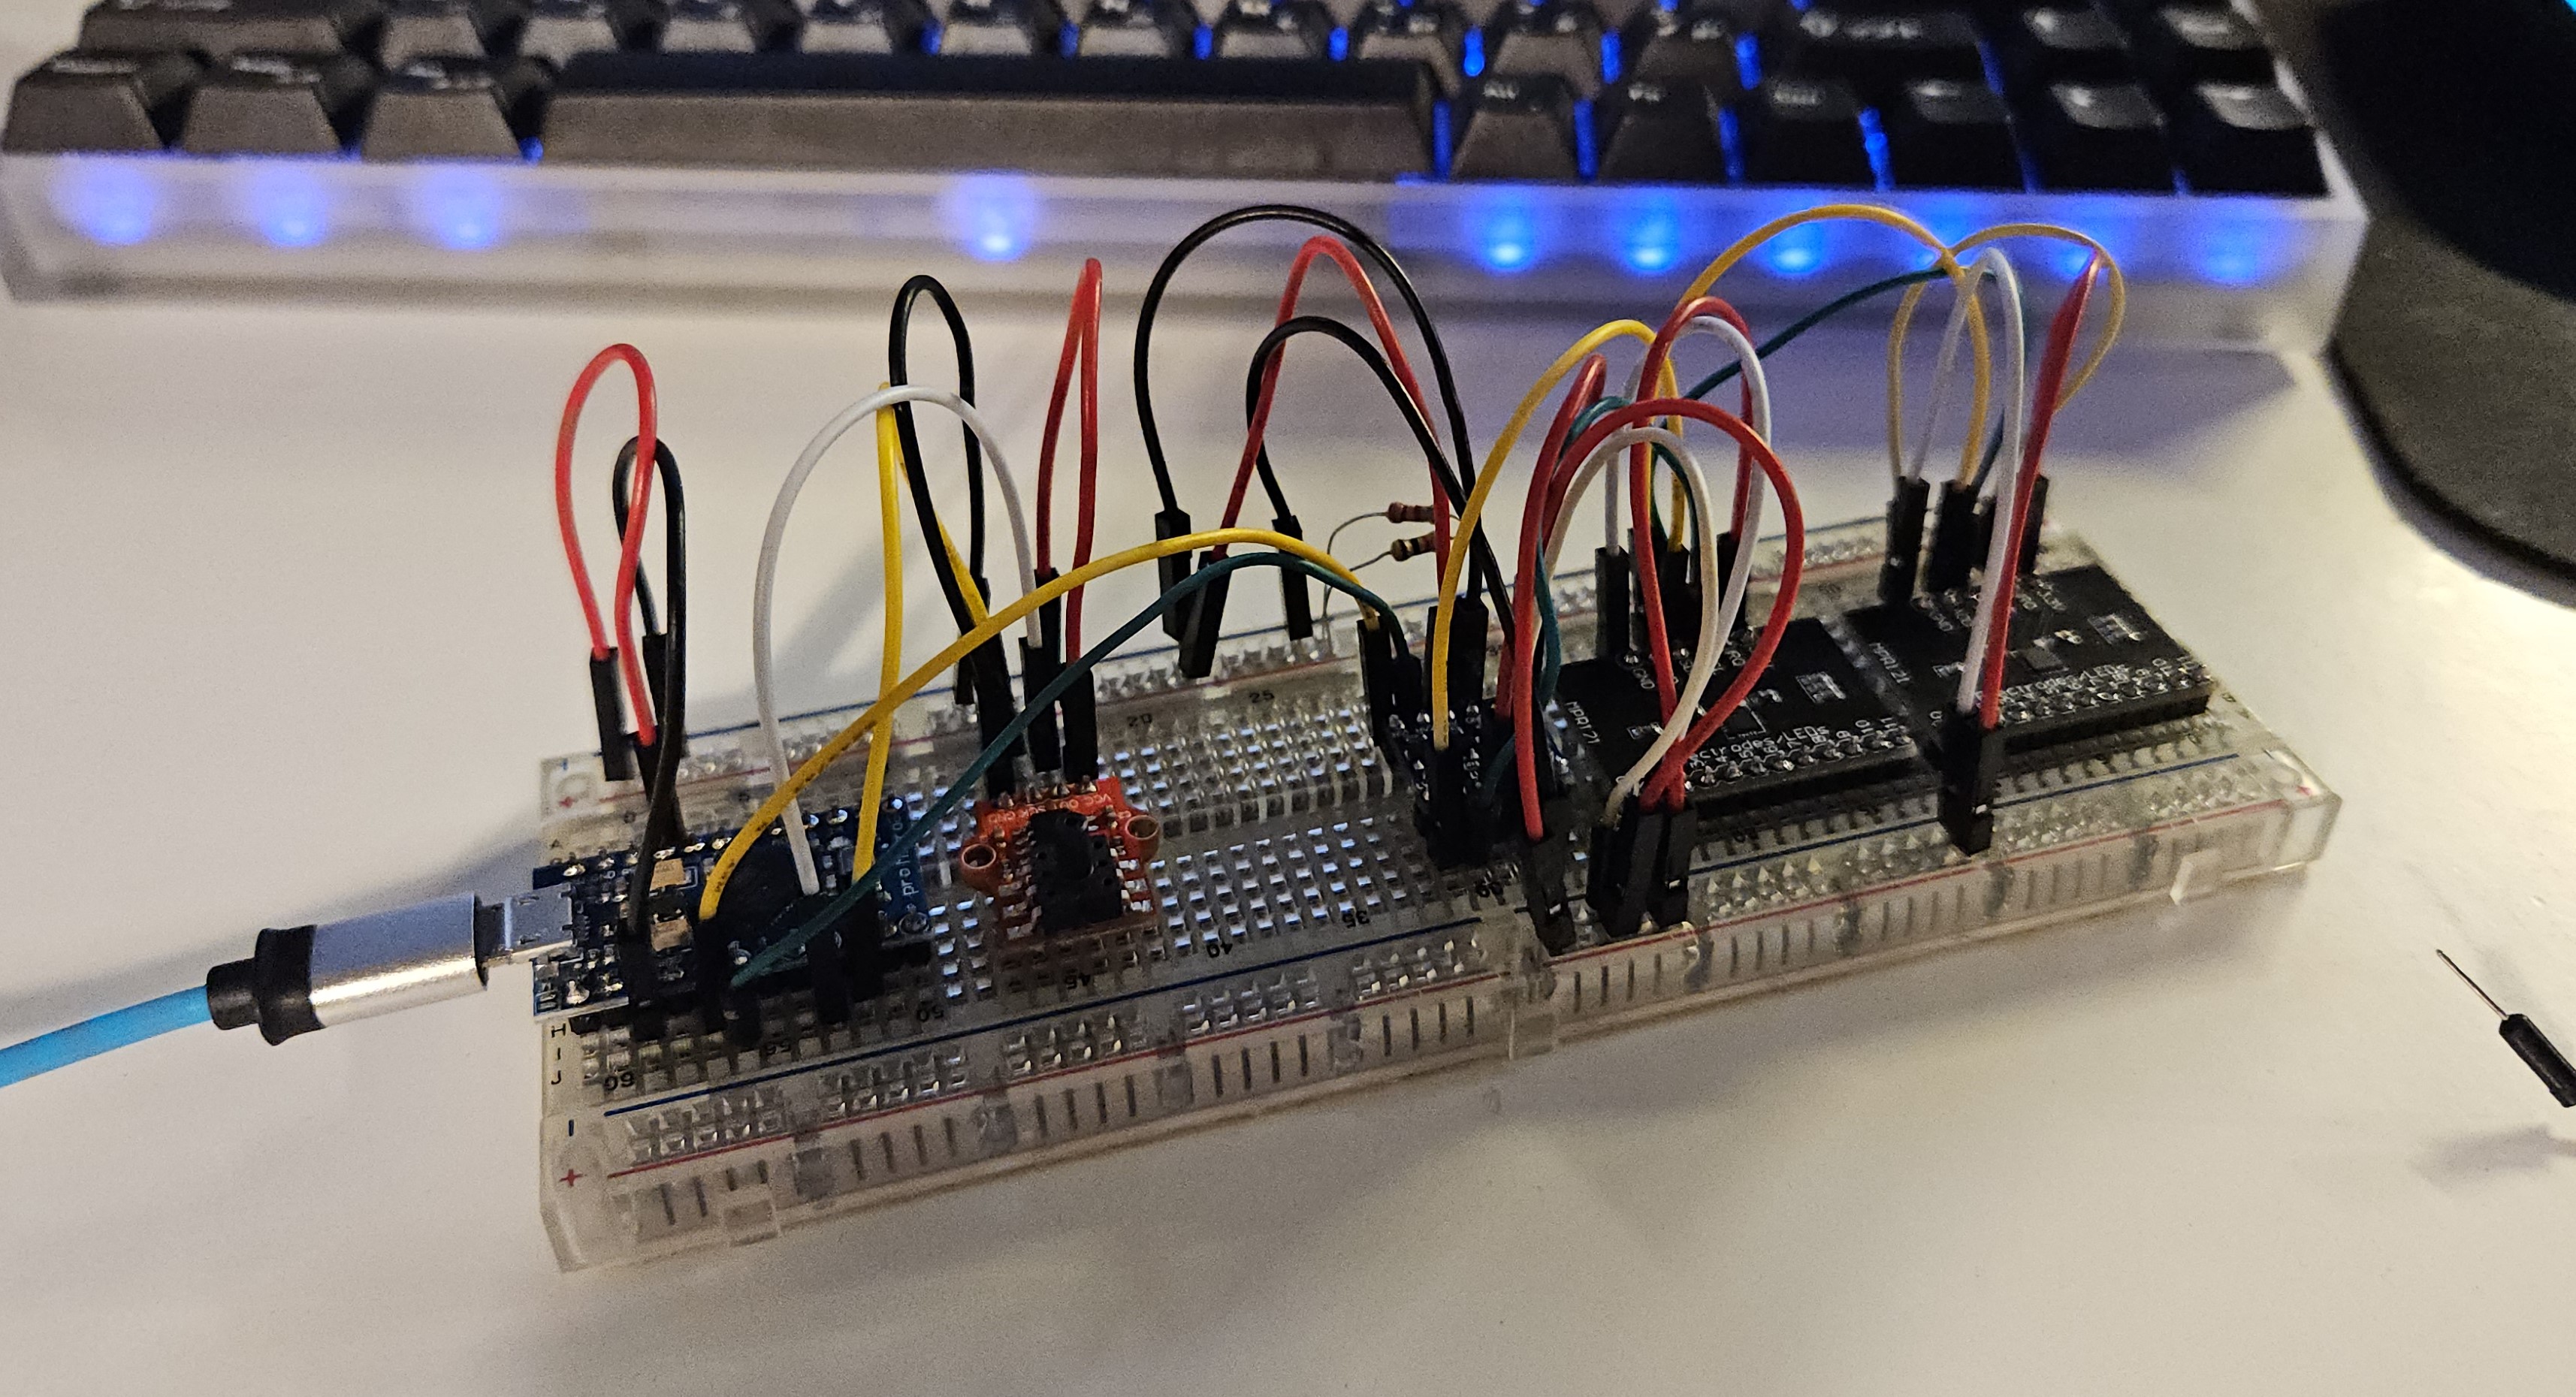
While working on my randbeacon project, I wanted to manage my WLED setups at OpenSauce with an ethernet interface - so I could use my laptop’s wireless card to connect to the venue’s network. As you can see, the initial setup with this raspberry pi was a little clunky and annoying. The core parts are there, a usb-ethernet adapter and a phone charging battery pack. I tried carrying this around outside while getting photos for that project, and it was the worst.
The core is a RPi3 running OpenWRT, a fast and straightforward network router firmware. I also picked up a Gigabit network switch, which is throttled by the RPi3’s 10/100 ethernet port - but this isn’t primarily for speed, this is for when nothing else would work.
Another critical piece is that the switch is powered off 5V DC. This way I was able to make a dead simple cable that connects to a phone charger battery, which is way easier to integrate into a project than naked Lithium batteries and charge controllers. Regulating voltage is annoying, and more expensive anyway if the usecase doesn’t call for extreme current draw.
The acrylic was scrap cutoffs from TAP plastics here in the bay area. They go for a dollar a sheet and are great value if the stuff you are making is small. I did round the corners and cut some holes, so the QL laser cutter came in handy again.
This setup fits perfectly in a backpack.
Another good thing to know is battery life. Mathematically, the 10 Ah pack could provide about 3 hours and 20 minutes of operation for the rated max of 2.5A (RPI 3B+) + 0.46A (Switch). In my own test of letting everything idle, the battery lasts about 12 hours. With these bounds I know the rough capacity and I’m pretty happy with this.
]]>Nicky MassoWeb Soundboard2025-11-16T00:00:00+00:002025-11-16T00:00:00+00:00https://starmaid.github.io/blog/web-soundboardCheck out the readme on the github page.]]>Nicky MassoMy own EWI2025-09-05T00:00:00+00:002025-09-05T00:00:00+00:00https://starmaid.github.io/blog/ewi
This is a classic example of “taking an exit ramp” from a project. I wanted to make my own version of an electric wind instrument (EWI) but also wanted to involve my friends in a fun group project.
The Idea
The Akai EWI is a really cool. A novel method of MIDI interface with a computer, that makes you play differently than if you were playing on a keyboard. I don’t know how to play saxophone, so I also think this would be a novel approach to music. Sure, you can buy one for $900, but that’s stupid. Its fairly common practice for internet weirdos to make their own ones.
Prior art
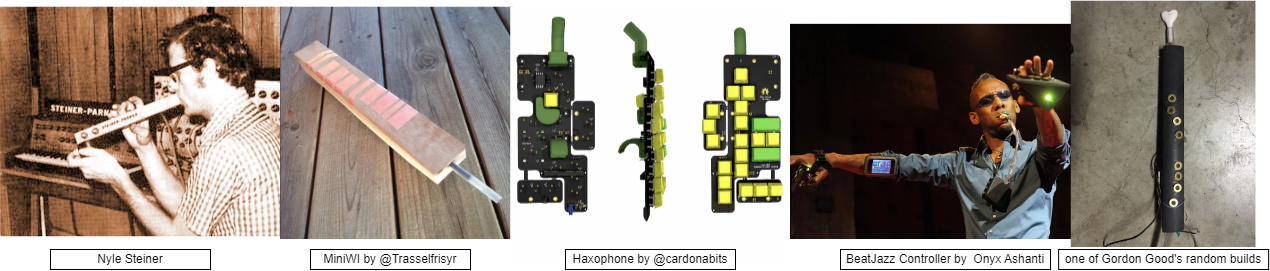
Had to give a search for some classic, non-product, EWI constructions.
The guy who invented the EWI Nyle Steiner has his own page of novel instruments.
MiniWI by @Trasselfrisyr is a classic minimum viable product, simple construction with conductive copper pads.
Haxophone by @cardonabits is a good modern design with mechanical keyboard switches. Also uses fluidsynth.
BeatJazz Controller by Onyx Ashanti has a radically different form factor. He uses PureData for non-ADSR synthesis and processing of the raw input data.
Gordon Good has been in the game for years, and also fun fact does projects at CCRMA at Stanford. Has a bunch of blog posts about non-ADSR synthesizers.
There were also several builds at Opensauce 2025 that were generally similar to these builds.
Our Build
First we have to talk about who the team was. I gathered a few friends; Harry, Ian, and Brooke. The first consideration we wanted to make was who the device was for. Each of us wanted to play one, and knew maybe 1 or 2 other people who might find them interesting if they worked.
This led to a batch size of maybe 3-6 devices, which is a weird number. Its low enough that custom PCBs are still annoying and expensive, and any annoying processes in the construction steps would have to be somewhat repeatable. We also had no delusions that we would be making any money off this, so using like a $200/ea bite force sensor would probably not be a worthwhile inclusion. Goal was cheap, repeatable, and functional enough.
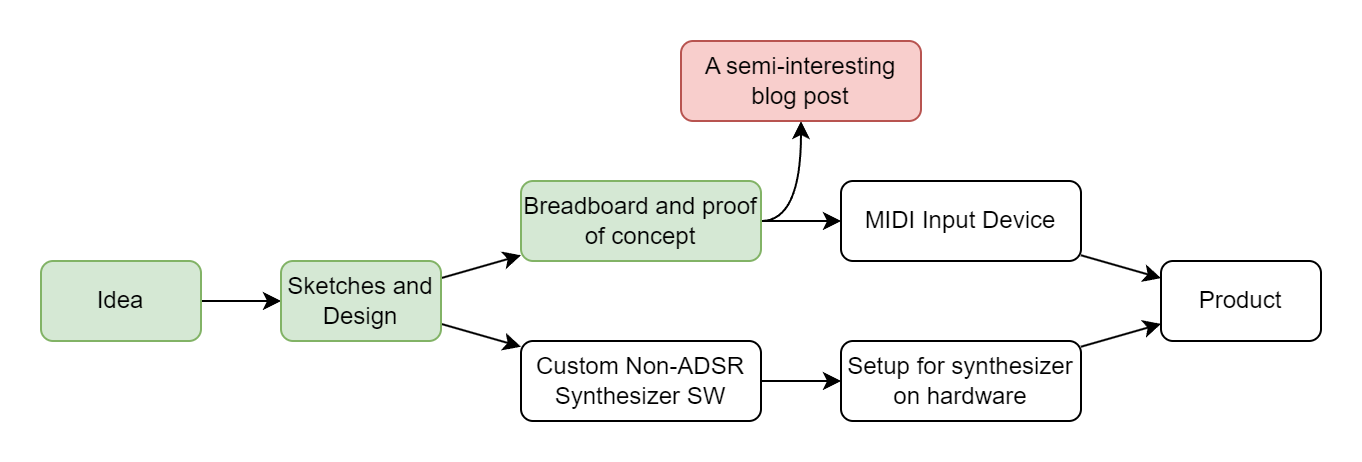
The gang went back and forth but we ultimately decided to separate the input management from the synthesizer part - use an arduino with its many input channels on one side of the versatile MIDI interface, and then connect it to anything downstream, a full computer or some embedded synthesizer. This also gave us a few off ramps to consider.
We also decided that using capacitive pads would be simpler to wire and easier/faster to play, so we decided to look into soldering to pads or tape or something. This would result in a less tactile device, which could be a downside, but that was deemed an acceptable tradeoff.
Side note: Off Ramps
Sometimes you realize you are done working on a project. Not that the project is complete, but that the remaining work is not novel or compelling. This is where the “off ramp” comes into play - a point where the project is presentable and demonstrates something interesting, even if the full vision is not complete. As my projects grow in scale, I find it more useful to build these points in from the very design and planning phase. I also want to note that this doesn’t make me any less motivated to go through and finish a project - it maybe makes it even easier to approach large goals, because I know failure will still leave me with something.
I want to credit this idea and phrasing to Brooke, who really demonstrated it with her quilted jacket project. Link will be added here if she ever posts about it.
Build - Part 2
Parts List
This is for the MIDI instrument part. The synth part would be connected over USB to this component.
Part
Count
Price/per
Arduino Pro Micro
1
~$5
3.3-5V logic level shifter
1
~$1
MPR121 Capacitive touch breakout board
2
~$3
TM7711 ADC + Pressure Sensor
2
~$2
I got all the parts a few weeks later, and started breadboarding them together. Simple circuits with the example code to get things working. Around here I think I accidentally broke one of the breath sensors, either by blowing too hard or maybe soldering it too hot. Not sure, I just kind of expect those things to have a failure rate. There is a flexible diaphram in there somewhere, and I think its possible for a human to overpower it.
Software Design
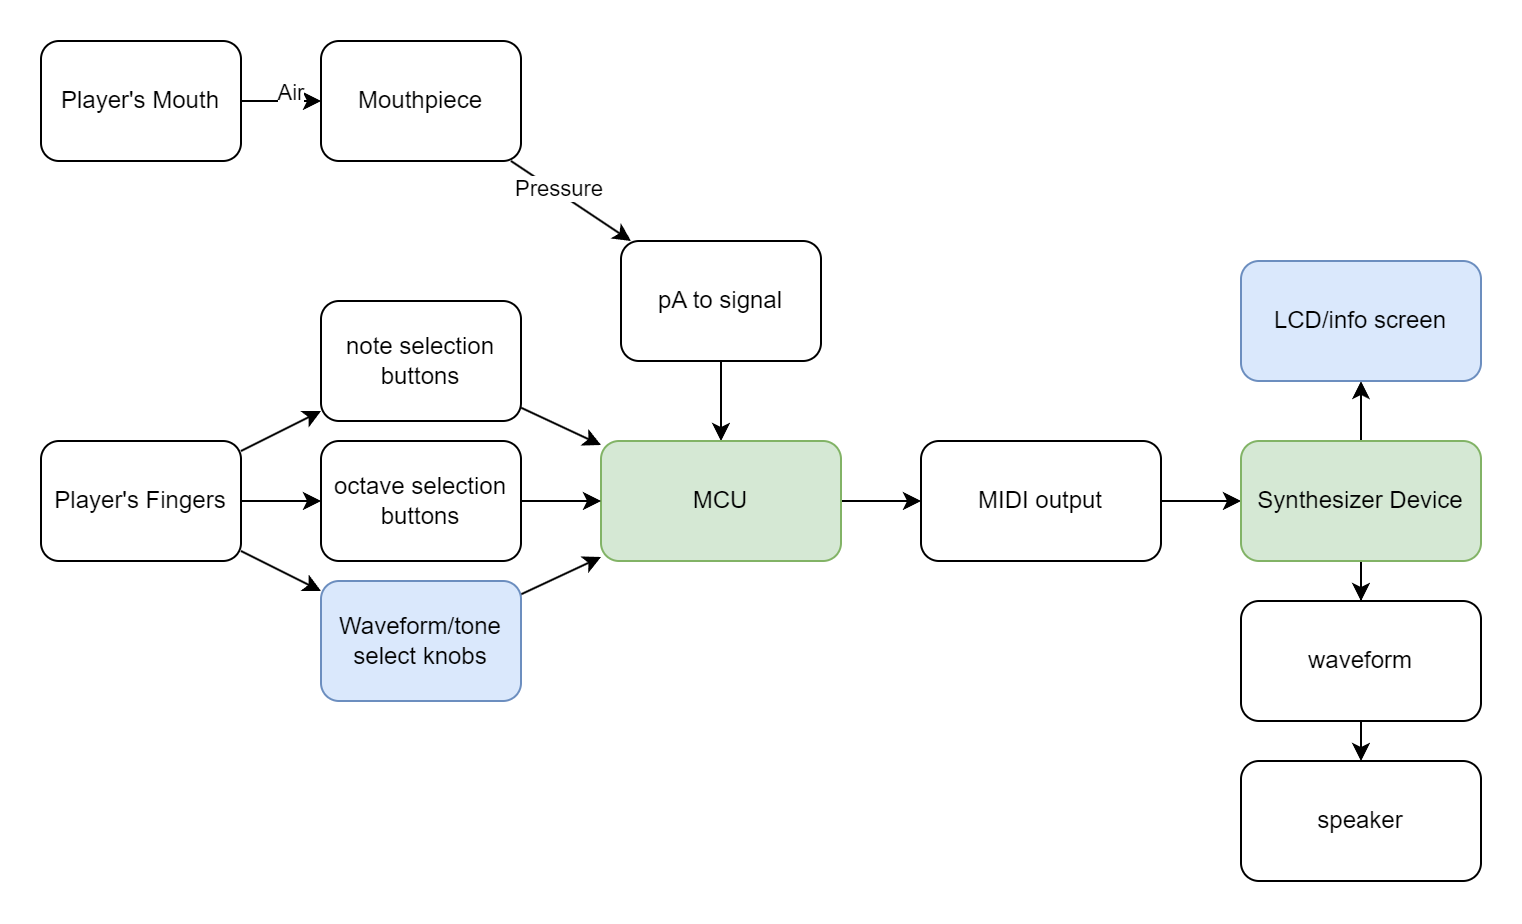
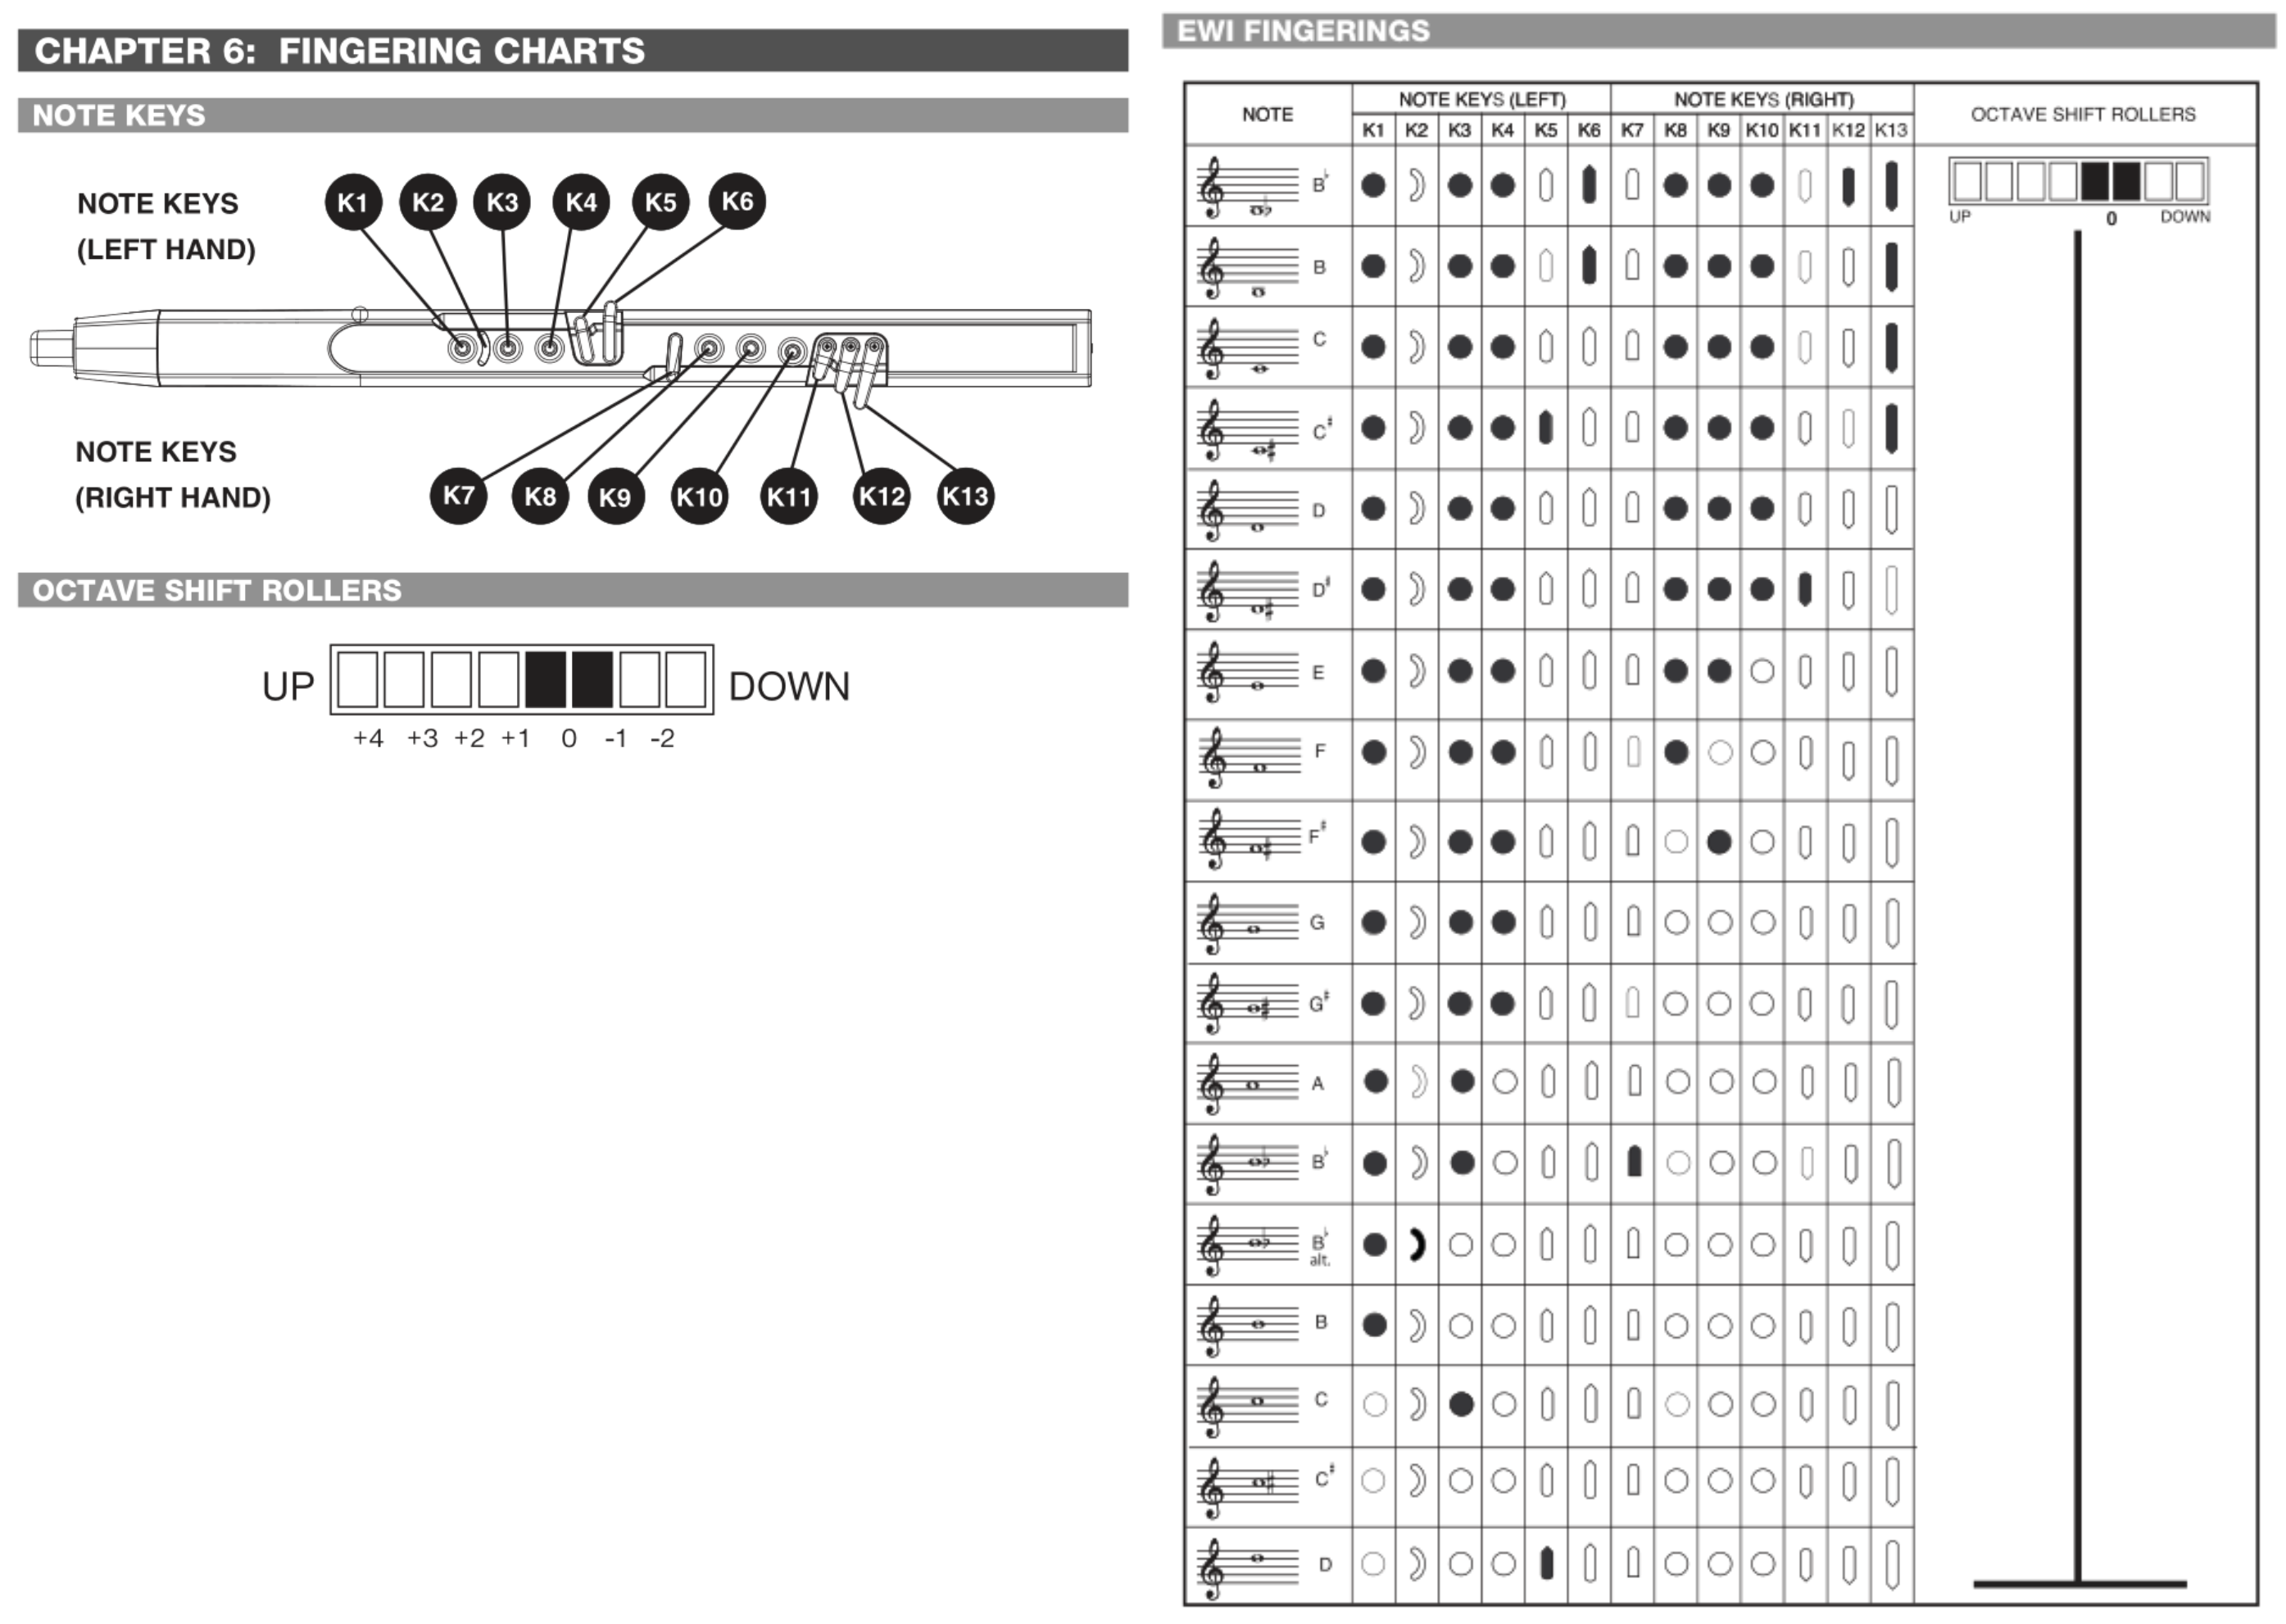
As I said, I don’t know how to play any woodwind instruments. I decided that the engineers at Akai probably know a thing or two about how to map keys to notes - and great engineers steal.
I then just made sure I had enough IO channels to match the button setup.
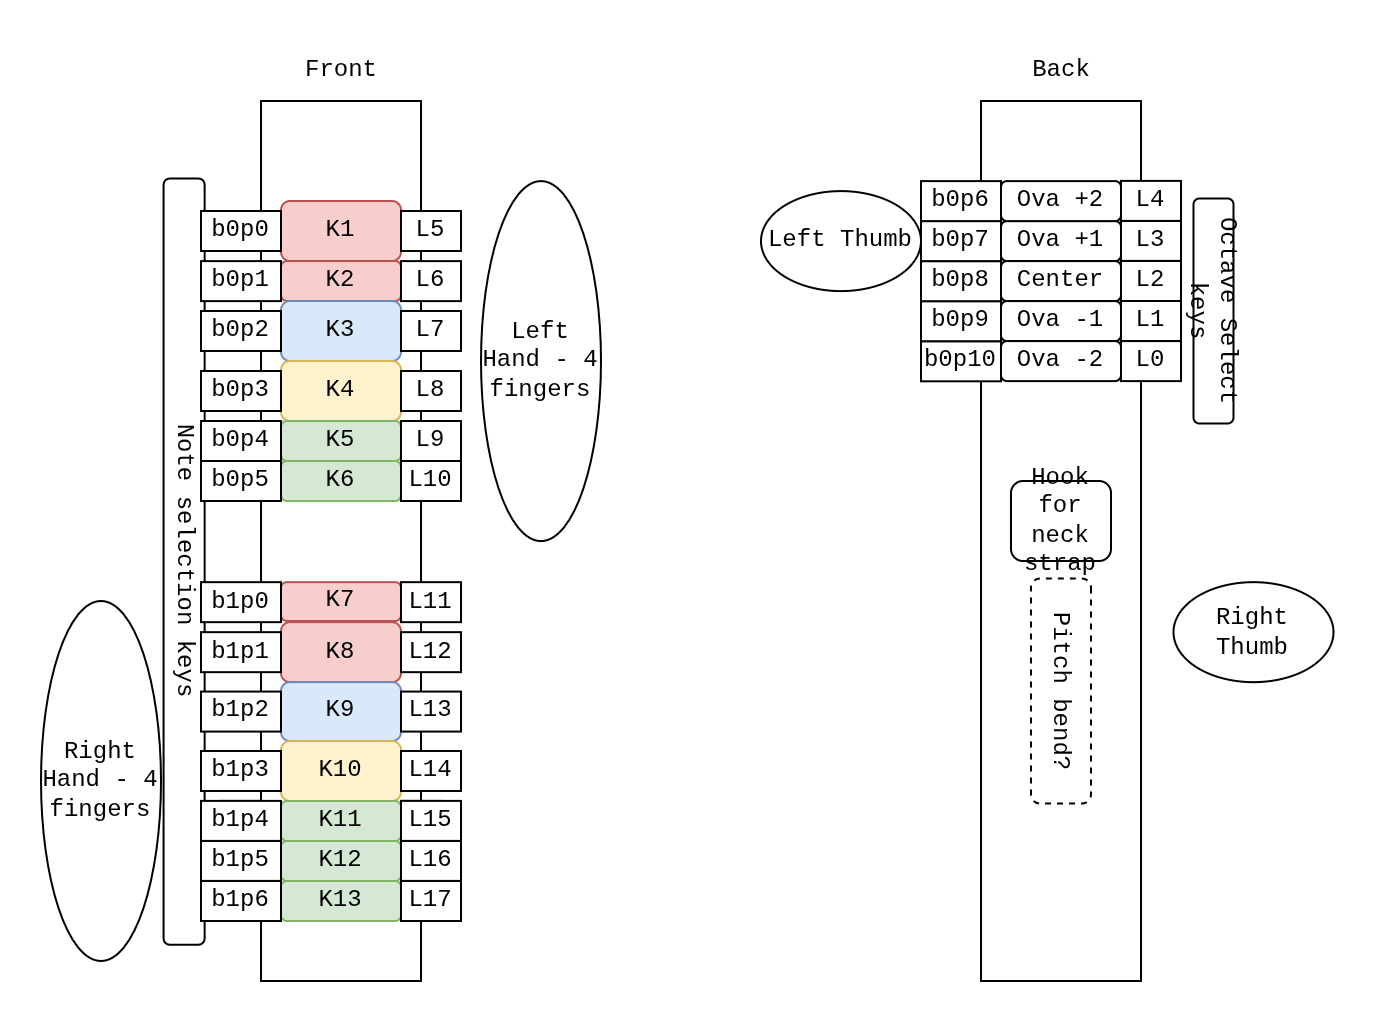
This diagram outlines multiple useful values for me to keep track of.
Most prominent is a number prefaced with a K. This maps them to keys in Akai’s manual.
the number in the pattern bxpx is the IO board index and channel index. There are two boards with 12 channels each.
the number prefaced with an L indicates where in the flat array of booleans I place that value.
I wanted to use this project to practice some boolean operators. This was mostly just for love of the game. Here is an array I used to mask input values and translate them into the right spot in the array. During testing I noticed that the first two pins on one of my capacitive boards weren’t working, so I just rewired it on the spot and kept the naming the same (if you are trying this project out yourself, I hope you notice and change this if your boards work properly).
// define input to keys
// this should match the wiring you make.
uint32_t io_keys_map[NUM_IO] = {
    // board 0
    0b000000000000000000,
    0b000000000000000000, //p0 // the first two pins are broken?
    0b000000000000100000, //p1
    0b000000000001000000, //p2
    0b000000000010000000, //p3
    0b000000000100000000, //p4
    0b000000001000000000, //p5
    0b000000010000000000, //p6
    0b000000000000010000, //p7
    0b000000000000001000, //p8
    0b000000000000000100, //p9
    0b000000000000000010, //p10
    0b000000000000000001, //p11
    0b000000000000000000, //x12 unused
    0b000000000000000000, //x13
    0b000000000000000000, //x14
    // board 1
    0b000000100000000000, //p0
    0b000001000000000000, //p1
    0b000010000000000000, //p2
    0b000100000000000000, //p3
    0b001000000000000000, //p4
    0b010000000000000000, //p5
    0b100000000000000000, //p6
    0b000000000000000000, //p7 unused
    0b000000000000000000, //p8
    0b000000000000000000, //p9
    0b000000000000000000, //p10
    0b000000000000000000, //p11
    0b000000000000000000, //x12
    0b000000000000000000, //x13
    0b000000000000000000, //x14
    0b000000000000000000  //x15
  };
All you need to do to start with an array of physical “buttons” and create an array of “keys” is to AND and then ADD the bitmasks.
// read from inputs
touched_b0 = b0.touched();
touched_b1 = b1.touched();

// turn into logical values
m_allbuttons_held = touched_b0 + ((uint32_t) touched_b1 << 16);

m_allkeys_held = 0;

// map the IO to the keys in order
for (int i=0; i<NUM_IO; i++) {
  testbit = (uint32_t) 1 << i;
  if (m_allbuttons_held & testbit) {
    m_allkeys_held += io_keys_map[i];
  }
}
Then I just copied from the manual to make the fingerings.
As you can see, there are invalid fingerings, that could be possibly triggered while transitioning between notes. I just hold the last note, but it would be interesting to get into semitone world. That would be a whole different model though.
int16_t getNote(uint32_t keys_held)
{
  for (uint8_t i = 0; i < NUM_FINGERINGS; i++)
  {
    if (keys_held == (uint32_t) keys_notes_map[i][0])
    {
      return keys_notes_map[i][1];
    }
  }
  return m_last_valid_note;
}
From here, I had the breath cause both a NOTEON/NOTEOFF effect when it crossed a threshold, as well as mapping to two different CC channels. One for positive pressure and another for negative pressure. The pitches are sent every cycle that NOTEON is active.
Whats Next
I have like zero desire to build or design the rest of this thing, so I just finished the breadboard test. I don’t think this project is particularly groundbreaking in the world of electronic breath synthesizers, so only if other members of the team pick up the effort will I continue.
In fall 2024, I went to Nexus Knockout 1 to watch my friend Scott play bot hockey. It looked cool, but I wasn’t sure if I would get myself involved.
I went again, and at the second Nexus Knockout in March 2025 I subbed in to drive Scott’s second robot. We won!
For winning, our team got tickets to the finals at Opensauce 2025. I also got laid off around this time, so I suddenly had a lot of free time to bring my own custom bot to the competition.
Construction
I talked to Scott about his design, because I liked it and thought it was simple but also adaptable. I made a model in FreeCAD.
To make sure I got sizing and stuff right without spending too much money, I lasered it out of particleboard at work, and printed parts out of PLA.
This gave me a platform to start doing electronics work on the robot.
I got the ESCs set up, the receiver bound, and made sure I wasn’t drawing too much current. 20A max using this clamp ammeter was great to see. I was using 80A ESCs and had a battery that could do 170A burst, so I was totally overspecced. The capacity would likely last me multiple matches before fully depleting a battery, which would take the strain off only owning two of these.
I made a few tweaks to the design that involved shockmounting the motors in TPU, and this time I was ready for a laser. I had an idea for a porcelain-style floral pattern on my robot, and took a small detour to write a script about it. Check out the GitHub page for more on that.
After that, I was ready to take it for a test against real robots. Scott and Kyle were able to meet up for some practice in a nice shaded parking lot.
It was super helpful! I discovered a few major, game-breaking problems.
I couldn’t keep the puck in my forks, it would just bounce over.
Solution: build raised walls onto the rails.
Due to my weight distribution, I couldn’t push other robots.
Solution: move the battery behind the wheels, move the rails closer to the center.
The way my wheels were mounted caused massive amounts of friction in my gearboxes, and also caused them to slowly disassemble themselves. This heat buildup also started melting my motor isolator sections.
Solution: mount the wheels differently. Also, add airflow and heatsinks to the motor enclosure.
Each of these was solvable, and any one of them would have made game day a nightmare. This resulted in a redesign, which resulted in a more balanced bot.
So shiny! I had time for one practice the night before Opensauce with my team for this competition - Hock Stuff! Orion and Nick were able to get their bots driving and we had a quick practice, and I made a last minute discovery that I needed a wheelie bar - a quick print the night before the competition. Unfortunately, our practice was also late at night, and I didn’t get any good photos of the robots.
Bunny, who helped run and organize the tournament, also drew a cartoon of my bot!
Competition
Maidbot shows her stuff on the rink during practice. Its okay! Shes just delicate.
Friday was loadin and systems check. We all got to make sure things were working and do last minute assembly and testing. I was mostly relaxed once I got everything set up, as we had no battles.
It was fun to get the whole bot hockey gang together!
POV the first match is about to start
So focused…
Our team:
Orion Beach, also engineering lead of Offbeat Robotics, and their bigbot Hijinx
We had three guest drivers over the course of the competition. This was super fun and Orion and Nick have some cool friends! IT was also helpful because Orion hadn’t let the loctite dry on the wheel nuts and they kept falling off during the compeition, requiring quick bot swaps. This also kept the energy high and got more people involved, so thats super cool.
Bam Singhasaneh from Team Valkrie helped us defeat team Magic Smoke in the qualifiers, as well as subbing in periodically through other matches.
Lisa Winter, who is normally judging these kinds of matches, helped us beat Royally Pucked in the qualifiers.
Matt Vasquez from Team Fast helped us defeat Royally Pucked again, in the first round of the elimination bracket.
We did pretty well in the qualifiers. Second-highest seed. At the end of the last match on Saturday, somehow the rear panel of my robot was completely shattered. I only noticed because my wheelie bar was knocked out and I had a bit of a controls issue - the team sticker was the only thing keeping my battery compartment closed. Acrylic is not a good choice for bot combat, and everyone I talked to expressed this - but I made it work somehow. Definitely something I’ll fix before the next compeition.
Luckily I had a spare! I also spent that night printing a cover that allowed me to stuff some foam between the outside of the robot and that panel. It probably saved my ass a few times (literally!)
That brought us into day two, where we entered the elimination bracket.
Honestly the vibes were really cool. Cheering, struggling for victory, but also knowing that these are just toys and everyone is here to have some fun.
We got second place! Team (No) Ice is just…really good. Their drivers are top notch, and their bots are incredibly efficient. We had a lead in both matches, but in the second half they were able to create a massive lead in the last few minutes of the game.
My robot got pretty beat up, but most of it was just on the tape I slapped all over the panels to keep them from shattering! Also, after the finals match, my motors were the hottest I’ve ever seen them, almost 80C. That’s crazy!!!!!!
Thanks to the tournament runners, Bunny, Alex, and all the other teams. It was a great time and I plan to keep playing this fun game with all of you.
]]>Nicky MassoRandbeacon2025-07-17T00:00:00+00:002025-07-17T00:00:00+00:00https://starmaid.github.io/blog/randbeaconCheck out the readme on the github page.]]>Nicky MassoFour Beers is Dinner Shirt Order2025-07-10T00:00:00+00:002025-07-10T00:00:00+00:00https://starmaid.github.io/blog/four-beers-order
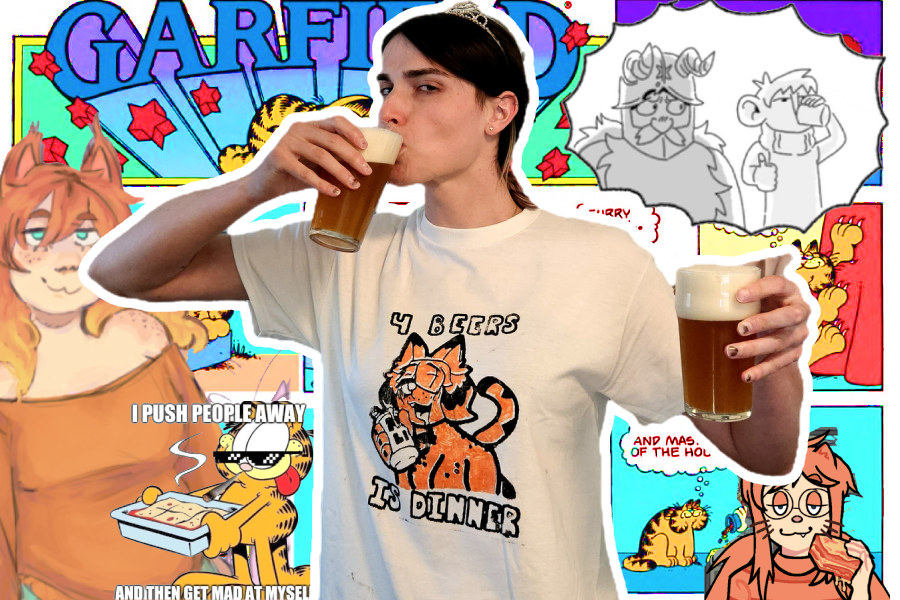
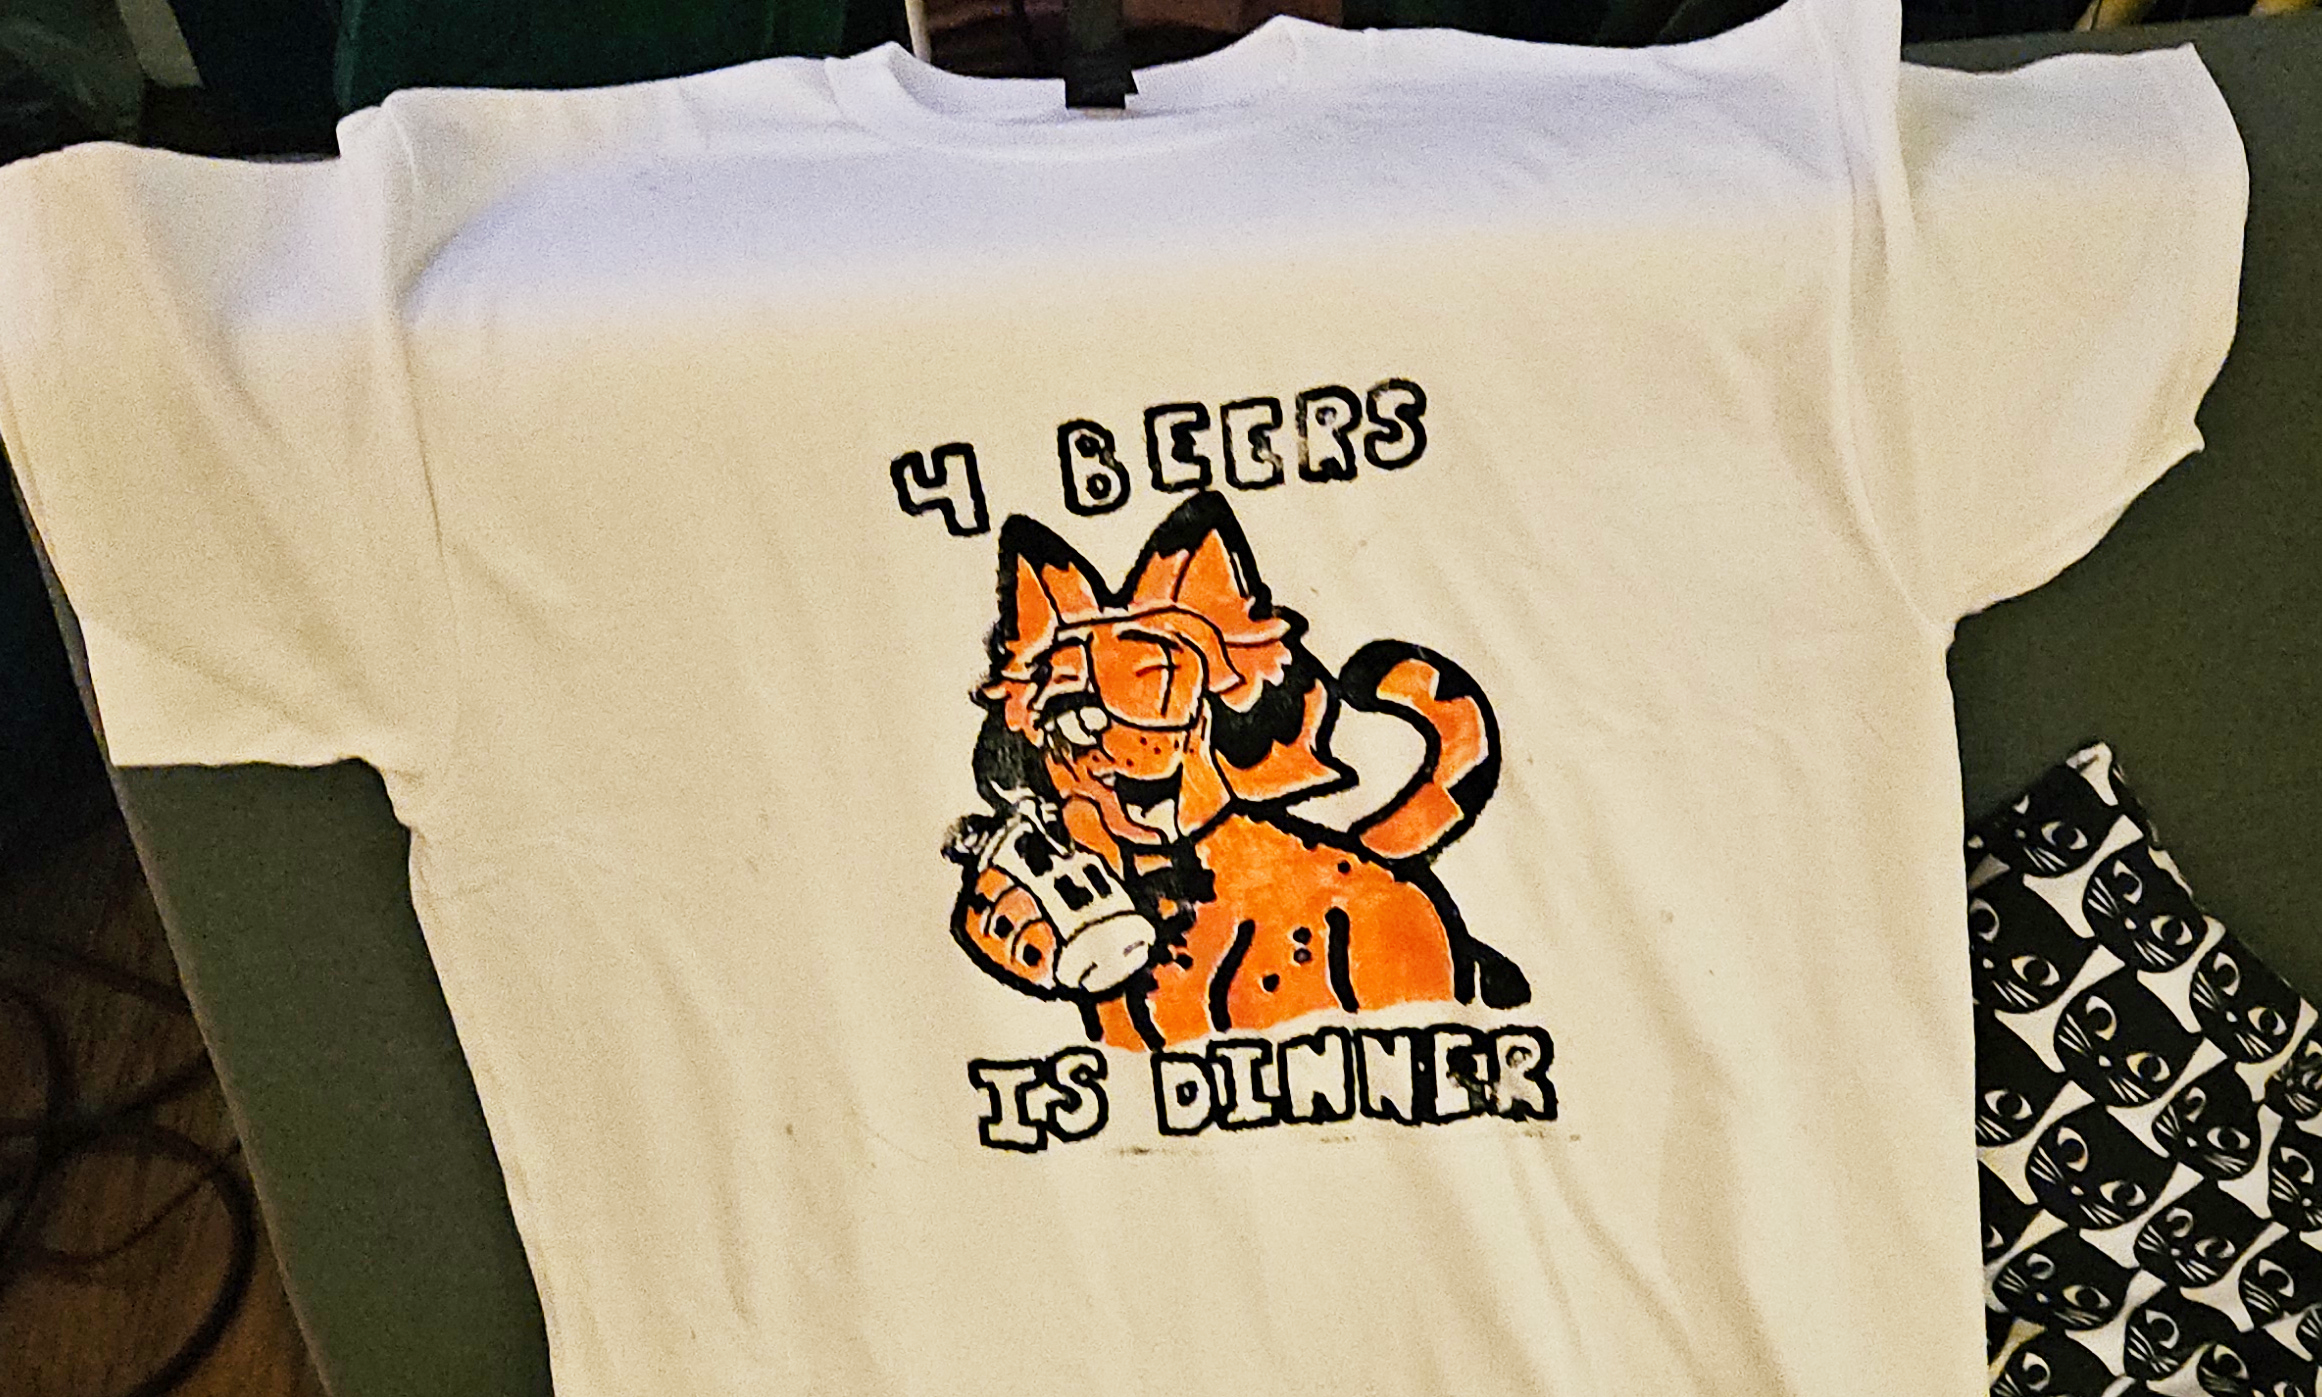
This shirt was designed by my friend Modawful and printed using a 3D-printed stamp onto cotton shirts.
Theyre $10 because this stuff costs money sorry. I’m just trying to break even.
]]>Nicky MassoFloral Pattern Generator2025-06-26T00:00:00+00:002025-06-26T00:00:00+00:00https://starmaid.github.io/blog/floral-genCheck out the readme on the github page.]]>Nicky MassoLa Lune Acrylic Sign2025-06-22T00:00:00+00:002025-06-22T00:00:00+00:00https://starmaid.github.io/blog/la-lune
This is a small acrylic sign I made for my girlfriend Lucy’s birthday. This was also a test project for learning to use the laser at QL.